Building Dynamic Forms with React Hook Form
An essential guide on how to build powerful forms in react.


Table of contents
- Form Handling in React
- Why use React Hook Form
- Prerequisites
- Working with React Hook Form
- Installing React Hook Form
- Registering Form Elements
- Validating forms
- Error Handling
- Using Schema-based Form Validation
- How to Reset Input Values
- Integrating with Other UI Libraries
- Subscribing to Input Field Changes
- Building Dynamic Forms
- Summary
- Conclusion
- References
Form is an essential part of most types of applications. It is one of the fastest and most effective ways to capture information. They serve as a communication bridge between users and organizations. Common usage of forms on web pages includes user authentication, searching feature and feedback collection.
Form Handling in React
By default, HTML Form elements maintain their state and get updated based on user input. However, React manages its form states through a single source of truth. It controls what happens in the form by binding each of the elements to a single state.
A form element whose value is controlled by react is known as a Controlled component.
import React, { useState } from "react";
const App = () => {
  const [userObj, setUserObj] = useState({
    username: "",
    email: ""
  });
  const handleChange = (e) => {
    e.preventDefault();
    setUserObj({ ...userObj,
     [e.target.name]: e.target.value });
  };
  return (
    <form>
      <input
        name="username"
        value={userObj.username}
        onChange={handleChange}
        type="text"
        placeholder="@adam"
      />
      <input
        name="email"
        value={userObj.email}
        onChange={handleChange}
        type="email"
        placeholder="adam@xyz.com"
      />
      <input type="submit" />
    </form>
  );
};
In the snippet above, react manages the state of the form elements by binding each input field (username and email) to the defined state (userObj). That makes the state a single source of truth for the form. Also, by binding handleChange function to the onChange the attribute of the input fields, the state becomes aware of changes to the form and will be updated accordingly.
In this article, I’ll be showing you how to build dynamic forms with react hooks form by leveraging some of its powerful APIs.
Why use React Hook Form
What is React hook form? React hook form is a performant, flexible, and extensible react form library with great developer experience. It handles every aspect of form building without extra effort.
As a library, react hook form library works well with other UI libraries thereby increasing the developer’s productivity and application performance in folds.
Some of its benefits are:
It removes unnecessary re-renders.
It minimizes validation computation
Components mount faster compared to others.
Delivers quality user experience without extra effort.
It possesses a rich set of APIs to build dynamic forms
Prerequisites
A good understanding of javascript
Ability to set up a react project.
Understanding of core react concepts
Zeal to learn new things
Working with React Hook Form
To get the most of this article, create a new react application to test out the code I’ll be writing in this article. You can use codesandbox to avoid setting up a react project from scratch.
Then, add the code below to your App.js
export default function App() {
  return (
    <div>
      <form>
        <input placeholder="name" type="text" />
        <select>
          <option value="male">Male</option>
          <option value="female">Female</option>
          <option value="other">Other</option>
        </select>
      </form>
    </div>
  );
}
Installing React Hook Form
Now let's install react-hook-form package using npm or yarn. To install react-hook-form, enter the command below into your terminal:
npm install react-hook-form
Next, we need to import the useForm hook of the react-hook form
import { useForm } from "react-hook-form";
And then we’ll need to add the following to your code.
const { register, handleSubmit } = useForm();
const onSubmit = data => console.log(data);
Our final code should look like this:
import React from "react";
import { useForm } from "react-hook-form";

export default function App() {
      const { register, handleSubmit } = useForm();
      const onSubmit = data => console.log(data);
      return (
        <div>
          <form>
            <input placeholder="name" type="text" />
            <select>
              <option value="male">Male</option>
              <option value="female">Female</option>
              <option value="other">Other</option>
            </select>
          </form>
        </div>
      );
}
Registering Form Elements
When working with react-hook-form, one of the essential concepts is to register your components into the useForm hooks. This allows its value to be accessible for form validation and submission. Add {...register("nameOfField")} to your fields' attribute to register your fields, just as shown in the form below. Replace "nameOfField" with the field name. The "register" function is a callback that returns a prop and injects it into your input.
<form>
      <input {...register("firstName")} />
      <select {...register("gender")}>
        <option value="female">female</option>
        <option value="male">male</option>
        <option value="other">other</option>
      </select>
      <input type="submit" />
 </form>
To submit the form, react-hook-form provides us with a handler function: handleSubmit. We’ll need to add onSubmit handler onSubmit={handleSubmit(onSubmit)} to the form or button element.
Add the onSubmit handler to your form as shown below:
// Dependencies
import React from "react";
import { useForm } from "react-hook-form";
// Styles
import "./tailwind.output.css";

const App = () => {
  const { register, handleSubmit } = useForm();
  const onSubmit = (data) => console.log(data);
  return (
    <div className="min-h-screen bg-white flex flex-col items-center">
      <h2 className="text-center text-4xl font-bold text-blue-black mb-10">
        React Hook Form
      </h2>
      <div>
        <form onSubmit={handleSubmit(onSubmit)}>
          <div className="mb-3">
            <label>First Name:</label>
            <br />
            <input
              className="border-2 border-blue-900 px-3 py-2 rounded-lg"
              {...register("firstName")}
            />
          </div>
          <div className="mb-10">
            <label>Last Name:</label>
            <br />
            <select
              className="border-2 w-full py-2 px-2 bg-white border-2 border-blue-900 rounded-lg"
              {...register("gender")}
            >
              <option value="female">Female</option>
              <option value="male">Male</option>
              <option value="other">Other</option>
            </select>
          </div>
          <div>
            <button className="bg-blue-900 rounded-lg font-semibold text-white px-2 py-3 w-full">
              Submit
            </button>
          </div>
        </form>
      </div>
    </div>
  );
};

export default App;
Your design should look similar to this:
Note:
I included tailwind css to beautify the UI.
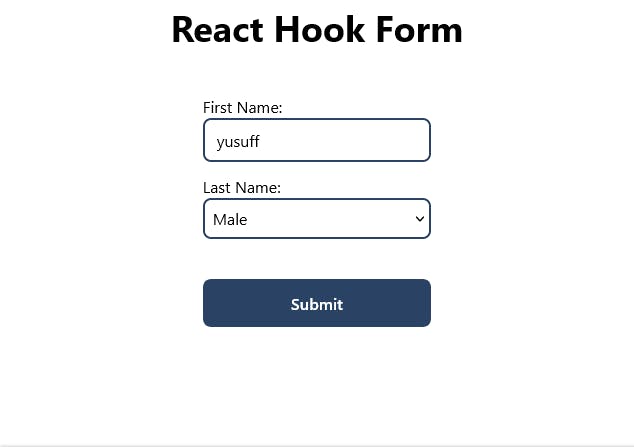
Now, click on the submit button and open your console. Your output should look like this:

For simplicity, I prefer logging the data on the console. In a real scenario, you should send the data to a backend service through an endpoint to implement features such as registration, survey, and login.
Validating forms
React hooks form makes form validation easier by aligning with HTML 5 standards. Also, it works pretty well with other schema-based form validation libraries like Joi, Yup, Zod and Superstruct. Validation rules supported by react-hooks-form include required, min, max, minLength, maxLength, pattern and validate. To use these validation rules, we add an object as the second argument for the register callback function as register(“someField”, {}).
- To validate by setting the maximum length and minimum length of the user input:
register("someField", { maxLength: 20, minLength}).
To validate a field using patterns we use:
register("someField", {pattern: /^[A-Za-z]+$/i })To enforce the user to enter value in the field, use this:
register("someField", {required: true})
- To apply multiple validation rules,
{
        required: true,
        validate: {
            checkLength: (value) => value.length >= 6,
            matchPattern: (value) =>
            /(?=.*\d)(?=.*[a-z])(?=.*[A-Z])(?!.*\s)(?=.*[!@#$*])/.test(
                value
            )
        }
    })}
The example below shows how to apply multiple validation rules to the password field:
<input
    type="password"
    name="password"
    {...register("password", {
        required: true,
        validate: {
            checkLength: (value) => value.length >= 6,
            matchPattern: (value) =>
            /(?=.*\d)(?=.*[a-z])(?=.*[A-Z])(?!.*\s)(?=.*[!@#$*])/.test(
                value
            )
        }
    })}
/>
Error Handling
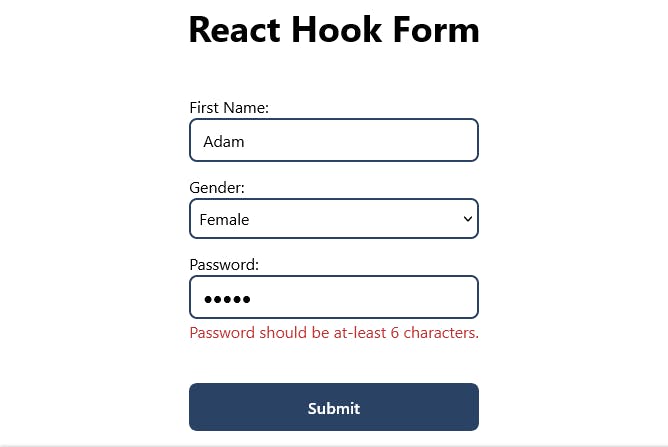
To display the error when a user enters the wrong data into fields, you should check the validation rule violated and display errors accordingly. The code below shows how you can achieve this.
{errors.password?.type === "required" && (
    <p className="errorMsg">Password is required.</p>
)}
{errors.password?.type === "checkLength" && (
    <p className="errorMsg">
        Password should be at-least 6 characters.
    </p>
)}
{errors.password?.type === "matchPattern" && (
    <p className="errorMsg">
        Password should contain at least one uppercase letter, lowercase
letter, digit, and special symbol.
    </p>
)}
Below is the full code:
// Dependencies
import React from "react";
import { useForm } from "react-hook-form";
// Styles
import "./tailwind.output.css";

const App = () => {
  const {
    register,
    handleSubmit,
    formState: { errors }
  } = useForm();
  const onSubmit = (data) => console.log(data);
  return (
    <div className="min-h-screen bg-white flex flex-col items-center">
      <h2 className="text-center text-4xl font-bold text-blue-black mb-10">
        React Hook Form
      </h2>
      <div>
        <form onSubmit={handleSubmit(onSubmit)}>
          <div className="mb-3">
            <label>First Name:</label>
            <br />
            <input
              placeholder="Adam"
              className="border-2 border-blue-900 px-3 py-2 rounded-lg w-full"
              {...register("firstName")}
            />
          </div>
          <div className="mb-3">
            <label>Gender:</label>
            <br />
            <select
              className="border-2 w-full py-2 px-2 bg-white border-2 border-blue-900 rounded-lg"
              {...register("gender")}
            >
              <option value="female">Female</option>
              <option value="male">Male</option>
              <option value="other">Other</option>
            </select>
          </div>
          <div className="mb-10">
            <label>Password:</label>
            <br />
            <input
              placeholder="**********"
              type="password"
              name="password"
              {...register("password", {
                required: true,
                validate: {
                  checkLength: (value) => value.length >= 6,
                  matchPattern: (value) =>
                    /(?=.*\d)(?=.*[a-z])(?=.*[A-Z])(?!.*\s)(?=.*[!@#$*])/.test(
                      value
                    )
                }
              })}
              className="border-2 border-blue-900 px-3 py-2 rounded-lg w-full"
            />
            {errors.password?.type === "required" && (
              <p className="text-red-700">Password is required.</p>
            )}
            {errors.password?.type === "checkLength" && (
              <p className="text-red-700">
                Password should be at-least 6 characters.
              </p>
            )}

            {errors.password?.type === "matchPattern" && (
              <p className="text-red-700">
                Password should contain at least one uppercase letter, lowercase
                letter, digit, and special symbol.
              </p>
            )}
          </div>

          <div>
            <button className="bg-blue-900 rounded-lg font-semibold text-white px-2 py-3 w-full">
              Submit
            </button>
          </div>
        </form>
      </div>
    </div>
  );
};

export default App;
The pattern-based validation is particularly useful if you want user inputs to follow a specific pattern for instance: as in email address (you@xyz.com), credit card number and so on.
- To set the minimum and max values, we use:
register(“someField”, { min: 18, max: 99));
To learn more about form validation rules, check here
Using Schema-based Form Validation
React hook form supports schema-based form validation using Yup, Zod, Superstruct, and Joi. To validate using any of these, install a schema validation library of your choice (I'll be using yup). Then, pass schema to useForm as an optional config.
npm install @hookform/resolvers yup
Then, prepare your schema for validation as shown below:
const schema = yup.object({
  firstName: yup.string().required(),
  age: yup.number().positive().integer().required(),
}).required();
Use the code below to integrate yup with react-hook-form.
import { useForm } from "react-hook-form";
import { yupResolver } from '@hookform/resolvers/yup';
import * as yup from "yup";

//define your schema
const schema = yup.object({
  firstName: yup.string().required(),
  age: yup.number().positive().integer().required(),
}).required();

export default function App() {
  const { register, handleSubmit, formState:{ errors } } = useForm({
    //Pass schema to yupResolver
    resolver: yupResolver(schema)
  });
  const onSubmit = data => console.log(data);

  return (
    <form onSubmit={handleSubmit(onSubmit)}>
      <div>
         <input {...register("firstName")} />
         <p>{errors.firstName?.message}</p>
      </div>
      <div>
       <input {...register("age")} />
      <p>{errors.age?.message}</p>
      </div>
      <button>Submit</button>
    </form>
  );
}
To learn more about yup schema validation, check here
How to Reset Input Values
On most forms, when the submit button has been triggered, the input fields are cleared. To achieve this, you should use the reset() function. To use reset, you should destructure reset from useForm as shown below:
const { reset } = useForm();
//pass the data object to the reset function:
reset({
    username: "",
    email: "",
    password: ""
});
The code above will enable you to reset your form upon form submission.
Integrating with Other UI Libraries
Using react hooks form with another UI Library is very easy. It provides you with a simple API to be able to achieve this. I'll show you how to use react-hook-form with other UI libraries by integrating it with react-select and material-ui.
Instead of the register function you used in the previous sections, you should use the Controller component, which will take care of the field registration process.
Firstly, let's install required libraries by entering the code below:
npm install --save react-select
npm install --save @material-ui/core
Import Select from "react-select";

Import { useForm, Controller } from “react-hook-form”;

import Input from "@material-ui/core/Input";

const { control, handleSubmit } = useForm({
    defaultValues: {
      firstName: '',
      select: {}
    }
  });

  const onSubmit = data => console.log(data);
  return (

<form onSubmit={handleSubmit(onSubmit)}
    <Controller
      name="firstName"
      control={control}
      render={({ field }) => <Input {...field} />}
      />

      <Controller
        name="select"
        control={control}
        render={({ field }) => <Select
          {...field}
          options={[
            { value: "chocolate", label: "Chocolate" },
            { value: "strawberry", label: "Strawberry" },
            { value: "vanilla", label: "Vanilla" }
          ]}
        />}
      />
      <input type="submit" />
</form>

  );
Looks strange? Don’t worry I will explain the code in a bit.
Let’s start with the controller component.
Controller component is a wrapper component for controlled inputs. Below are some of its attributes:
name: name property assigns a unique name to your input.
control: is like the brain of the for. It contains methods for registering components into react-hook-form.
render: is a function that returns a React element and provides the ability to attach events and values into the component. Also, It simplifies integrating with external controlled components with non-standard prop names. It provides onChange, onBlur, name, ref and value to the child component, and also a fieldState object which contains a specific input state, which can be attached to the child’s props. Through onChange, onBlur, name, ref, and value, the user's interaction with the form is reported to the react-hook-form. Error handling.
Subscribing to Input Field Changes
To subscribe to field changes with react-hook-form, we use the watch method to observe specified inputs and return their output. It is used in rendering input values and determining what to render based on certain conditions. We use watch by passing a string argument representing the name of the field watch(“inputName”). For multiple fields you should use watch() and pass an array containing the names of the input fields you want to track: watch(["firstName", "lastName"]).
Simple use case:
In my last project, I built a feature that auto-calculates results according to user input.
To watch inputs and trigger a callback, we use watch((data, { name, type }) => console.log(data, name, type)). Below is a simple example on how to use the watch method:
import React, { useEffect } from "react";
import { useForm } from "react-hook-form";

function WatchCode() {
  const { register, watch, formState: { errors }, handleSubmit } = useForm();
  const watchShowAge = watch("showAge", false); // you can supply default value as second argument
  const watchAllFields = watch(); // when pass nothing as argument, you are watching everything
  const watchFields = watch(["showAge", "number"]); // you can also target specific fields by their names

  // Callback version of watch.  It's your responsibility to unsubscribe when done.
  useEffect(() => {
    const subscription = watch((value, { name, type }) => console.log(value, name, type));
    return () => subscription.unsubscribe();
  }, [watch]);

  const onSubmit = data => console.log(data);

  return (
    <>
      <form onSubmit={handleSubmit(onSubmit)}>
        <input type="checkbox" {...register("showAge")} />
        {/* based on yes selection to display Age Input*/}
        {watchShowAge && <input type="number" {...register("age", { min: 50 })} />}
        <input type="submit" />
      </form>
    </>
  );
}
The code above will display a checkbox(showAge) and display the second field (age) if the value of the showAge is true.
This block of code looks vague right, I’ll explain what it does in a moment:
React.useEffect(() => {

const subscription = watch((value, { name, type }) => console.log(value, name, type));

return () => subscription.unsubscribe();

}, [watch]);
The code block sets up a side effect that watches the user input for changes, logs the current value, name, and type of the expression to the console whenever it changes and cleans up the side effect when the component unmounts. You use the useEffect hook to create the side-effect and pass the watch function as an argument to the component to watch for changes. The useEffect hook takes a callback function as an argument, which creates a subscription object by calling the watch function and returns a function that calls the unsubscribe method on the subscription object when the component unmounts. The useEffect hook also takes an array of values to watch for changes as a second argument. In this case, it contains a single value: watch. This means that the effect will re-run whenever the watch value changes.
Building Dynamic Forms
React hook form is a powerful tool for building dynamic forms. Recently at my workplace, I was tasked to implement a feature to enable users to add and delete multiple forms and submit them using a button. Initially, I considered implementing this feature from scratch. But, due to the time constraint, I had to look for an alternative solution. Then I came across react hook form API called useFieldArray. It works like magic for the above use case. Below is a simple code snippet to allow users to add a list of their friends and submit it together. For clarity, you should create a new react app on codesandbox:
import React from "react";
import { useForm, useFieldArray, Controller } from "react-hook-form";
import Creatable from "react-select/creatable";
const options = [
 { label: "Software Engineer", value: "Software Engineer" },
 { label: "Product Designer", value: "Product Designer" },
 { label: "Data Scientist", value: "Data Scientist" },
 { label: "UX Researcher", value: "UX Researcher" }
];
function DynamicForm() {
 const { register, control, handleSubmit, reset, trigger, setError } = useForm(
   {
     defaultValues: {
       friend: [{ firstName: "", lastName: "", discipline: "" }]
     }
   }
 );
 const { fields, append, remove } = useFieldArray({
   control,
   name: "friend"
 });

 return (
   <form onSubmit={handleSubmit((data) => console.log(data))}>
     <ul>
       {fields.map((item, index) => (
         <li key={item.id}>
           <div>
             <label for="firstName">First Name</label>
             <input {...register(`friend.${index}.firstName`)} />
           </div>
           <div>
             <label for="lastName">Last Name</label>
             <input {...register(`friend.${index}.lastName`)} />
           </div>
           <div>
             <label name="discipline"></label>
             <Controller
               render={({ field }) => (
                 <Creatable isClearable options={options} {...field} />
               )}
               name={`friend.${index}.discipline`}
               control={control}
             />
           </div>
           <button type="button" onClick={() => remove(index)}>
             Delete
           </button>
         </li>
       ))}
     </ul>
     <button
       type="button"
       onClick={() => append({ firstName: "", lastName: "", discipline: "" })}
     >
       append
     </button>
     <input type="submit" />
   </form>
 );
}

export default DynamicForm;
The code above will enable user to add and delete from the list of friends.
Summary
In this article, you have learned various react-hook-form concepts such as fields registration, form validation, error handling, integration with other UI libraries, subscription to input field changes, and building dynamic forms. With this knowledge in your arsenal, you are now equipped to handle forms efficiently in your next react projects.
Conclusion
As they say, practice makes perfect. React-hook-form improves user experience and speed up development process. Whether you're creating a straightforward contact form or a sophisticated data-entry system. This new approach will enable you to handle forms better in your React Applications. Have fun coding!